
In this article, I will provide detailed instructions on how to create a project with Scrapy and use it to analyze and extract housing data from the alonhadat website. If your machine doesn’t have Scrapy yet, you can install it using pip, see details at the website https://pypi.org/project/Scrapy/.
If you’re interested in a complete data pipeline from
crawl data->cleaning->analysis and visualization->machine learning->demo website, you can check out the repo https://github.com/trannguyenhan/house-price-prediction
Creating a Scrapy Project
Create a Scrapy project with the command:
1
scrapy startproject crawlerdata
Create an alonhadat spider with the command:
1
scrapy genspider alonhadat alonhadat.com.vn
Define the Data Fields to Extract
Clearly define the fields to extract in the items.py file:
1
2
3
4
5
6
7
8
9
10
11
12
13
14
15
16
17
18
19
20
21
22
23
24
25
26
import scrapy


class DataPriceItem(scrapy.Item):
    # define the fields for your item here like:
    # name = scrapy.Field()
    area = scrapy.Field()  # dien_tich \ double
    address = scrapy.Field()  # dia_chi \ string
    description = scrapy.Field()  # mo_ta \ string
    floor_number = scrapy.Field()  # so_lau (so_tang) \ int
    bedroom_number = scrapy.Field()  # so_phong_ngu \ int
    is_dinning_room = scrapy.Field()  # co_phong_an? \ boolean
    is_kitchen = scrapy.Field()  # co_bep? \ boolean
    is_terrace = scrapy.Field()  # co_san_thuong? \ boolean
    is_car_pack = scrapy.Field()  # co_cho_de_xe_hoi? \ boolean
    is_owner = scrapy.Field()  # chinh_chu? \ boolean
    start_date = scrapy.Field()  # ngay_dang_tin \ date || string
    end_date = scrapy.Field()  # ngay_ket_thuc \ date || string
    type = scrapy.Field()  # in('nha_mat_tien', 'nha_trong_hem') \ string
    direction = scrapy.Field()  # phuong_huong_nha (nam, bac, dong, tay) \ string
    street_in_front_of_house = scrapy.Field()  # do_rong_duong_truoc_nha \ int
    width = scrapy.Field()  # chieu_dai \ string
    height = scrapy.Field()  # chieu_rong \ string
    law = scrapy.Field()  # phap_ly \ string

    price = scrapy.Field()  # gia_nha \ double
Since crawling data is only the first step in our entire data pipeline, we need comments to clearly record each field to avoid confusion later and make it easier to understand and approach the project when looking back.
For this first simple project, we don’t need to worry about the middlelwares.py or pipelines.py files. The code in these files can be left as default for now.
Modify the settings.py File
Edit the settings.py file:
1
2
3
4
5
6
7
8
9
10
11
12
BOT_NAME = 'data_price'

SPIDER_MODULES = ['data_price.spiders']
NEWSPIDER_MODULE = 'data_price.spiders'

# Obey robots.txt rules
ROBOTSTXT_OBEY = True
DEFAULT_REQUEST_HEADERS = {
    'User-Agent': 'Mozilla/5.0 (X11; Linux x86_64; rv:48.0) Gecko/20100101 Firefox/48.0',
}

FEED_EXPORT_ENCODING = 'utf-8'
If your newly created Scrapy program has the variable ROBOTSTXT = False, then reassign it to True. For the specific reason, you can check my previous article https://demanejar.github.io/posts/what-is-crawler-and-something/#s%E1%BB%AD-d%E1%BB%A5ng-file-robotstxt
Write Spider to Analyze Website HTML
In AlonhadatSpider we need to write 3 functions: start_requests, parse_link, parse.
start_requests Function
This function will be run first and will be responsible for initializing the links to crawl. This might be a bit confusing, so let me give an example. Say you need to crawl the alonhadat site from page 3501 to page 4501, first you need to analyze how the URLs are designed on this website. Let’s visit the website and check a few pages:
1
2
3
https://alonhadat.com.vn/nha-dat/can-ban.html
https://alonhadat.com.vn/nha-dat/can-ban/trang--2.html
https://alonhadat.com.vn/nha-dat/can-ban/trang--3.html
From the above, we can temporarily conclude that the URL of this website between pages 1,2 follows the pattern ../trang--i.html. From this assumption, we write the start_requests function:
1
2
3
4
5
6
7
8
def start_requests(self):
    pages = []
    for i in range(3501,4501):
        domain = 'https://alonhadat.com.vn/can-ban-nha/trang--{}.htm'.format(i)
        pages.append(domain)

    for page in pages:
        yield scrapy.Request(url=page, callback=self.parse_link)
So we’ve finished initializing the links to crawl, now each created link will be input to the parse_link function.
parse_link Function
The task of this function is to get all article links in each article listing page created in the start_requests function. For example, when visiting an article listing page like this:
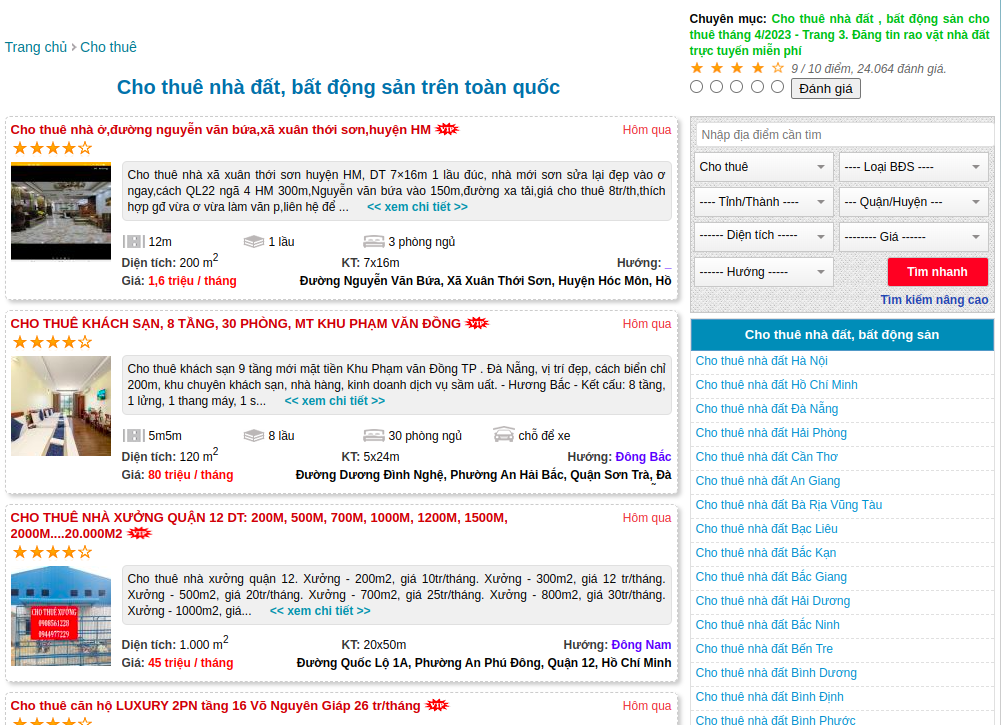
The desired result is a list of those article links:
1
2
3
4
5
[
  'https://alonhadat.com.vn/cho-thue-nha-o-duong-nguyen-van-bua-xa-xuan-thoi-son-huyen-hm-12662015.html',
  'https://alonhadat.com.vn/cho-thue-khach-san-8-tang-30phong-mt-khu-pham-van-dong-12682000.html',
  ...
]
Right-click on the element you need to get the xpath or css selector (with xpath or css selector it’s the same, I prefer using css selector so from now on I’ll mainly refer to css selector) to get the css selector of the element:
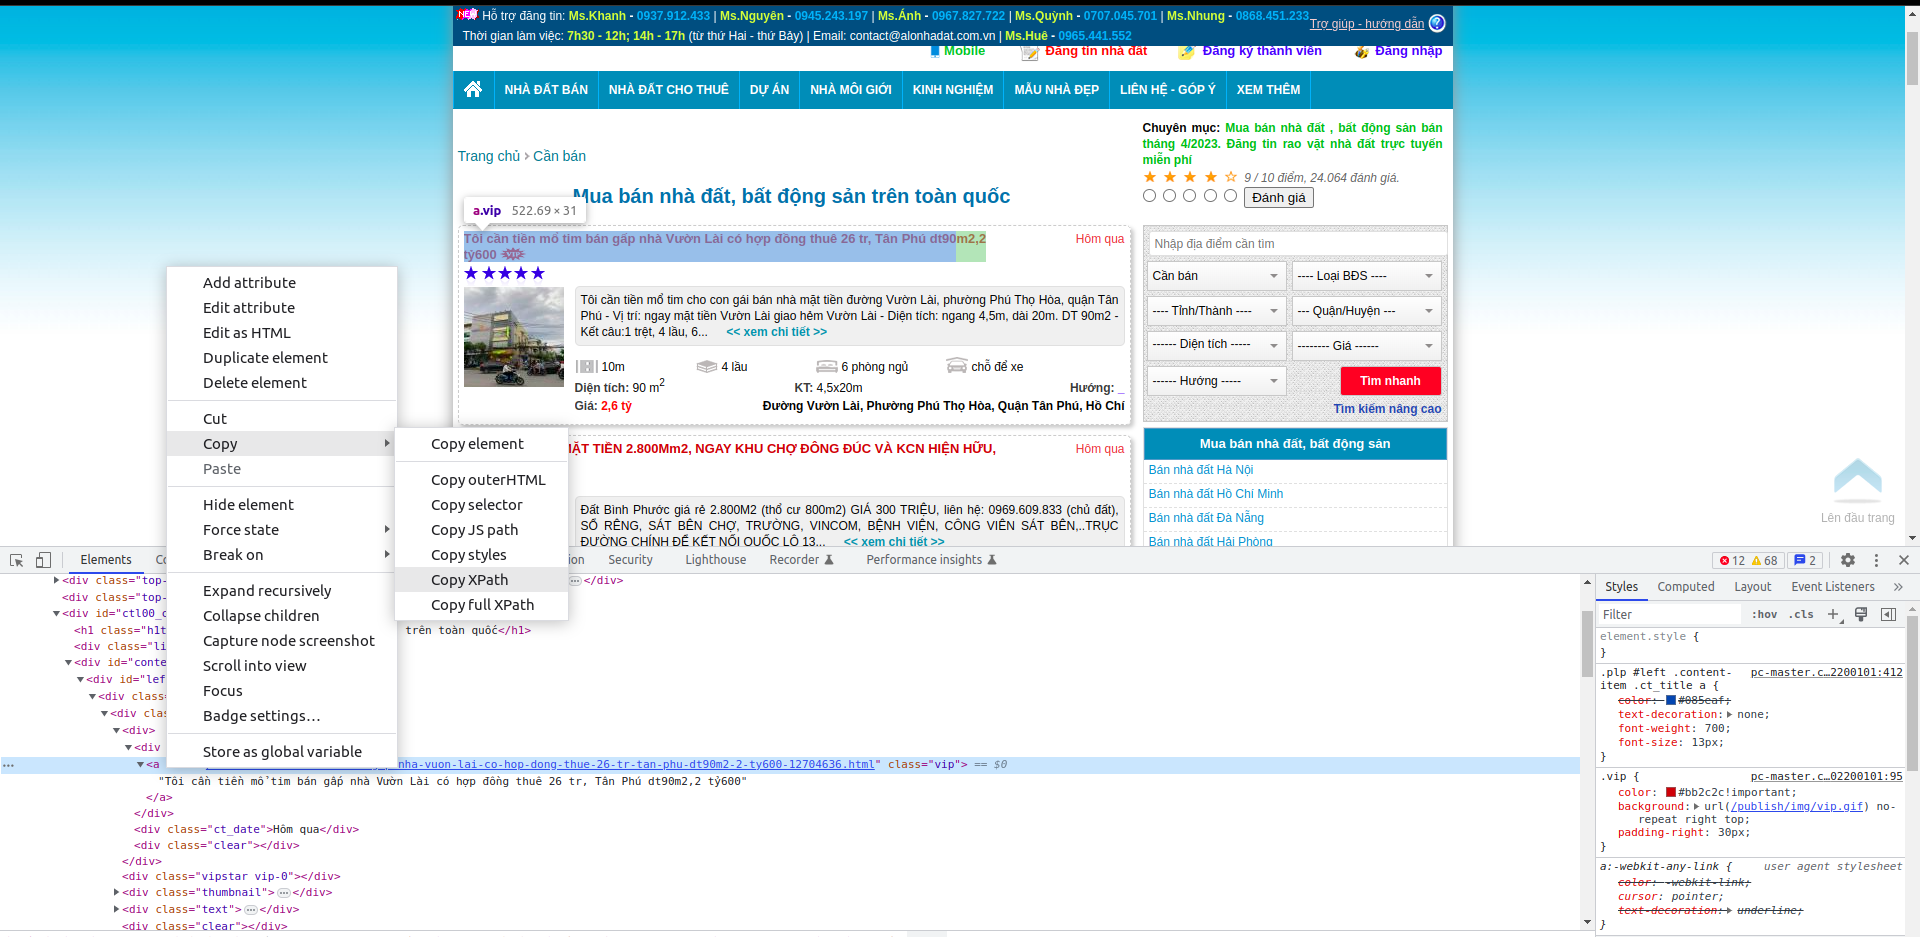
In this case, the css selector of the element containing the URL of the first article is (it’s an a tag element):
1
#left > div.content-items > div:nth-child(1) > div:nth-child(1) > div.ct_title > a
In Scrapy, to get additional attributes, we add ::attr(href) where href is the attribute of that element. So to get the URL contained in the href attribute of the a tag, the css selector would be:
1
#left > div.content-items > div:nth-child(1) > div:nth-child(1) > div.ct_title > a::attr(href)
Note: I should also note about getting
CSS SELECTORthis way. First, it’s very prone to change, and second, getting it this way you’ll only get one element you need. In later articles, I’ll guide everyone on how to get thecss selectorof each element by analyzing the unique attributes of that element or adjacent elements. For this article, we’ll continue with this method.
This is just the css selector of the first article URL, for the subsequent article URLs, we do the same and will have a list of css selector containing article URLs as follows:
1
2
3
4
#left > div.content-items > div:nth-child(1) > div:nth-child(1) > div.ct_title > a::attr(href)
#left > div.content-items > div:nth-child(2) > div:nth-child(1) > div.ct_title > a::attr(href)
#left > div.content-items > div:nth-child(3) > div:nth-child(1) > div.ct_title > a::attr(href)
#left > div.content-items > div:nth-child(4) > div:nth-child(1) > div.ct_title > a::attr(href)
Having tentatively predicted the structure of the css selector containing article links, we’ll write the parse_link function as follows:
1
2
3
4
5
6
7
def parse_link(self, response):
    for i in range(1, 21):
        str = '#left > div.content-items > div:nth-child({}) > div:nth-child(1) > div.ct_title > a::attr(href)'.format(i)
        link = response.css(str).extract_first()
        link = 'https://alonhadat.com.vn/' + link

        yield scrapy.Request(url=link, callback=self.parse)
Why range(1, 21)? Based on website analysis, you’ll see that an article listing page has 21 articles. Now each article URL will be input to the parse function. The next task is to analyze and extract the necessary data that has been defined in the Item class.
parse Function
With the method of getting css selector as above, we can quickly write the parse function as follows:
1
2
3
4
5
6
7
8
9
10
11
12
13
14
15
16
17
18
19
20
21
22
23
24
25
26
def parse(self, response, **kwargs):
    item = DataPriceItem()
    item['price'] = self.extract(response, '#left > div.property > div.moreinfor > span.price > span.value')

    item['description'] = self.extract(response, '#left > div.property > div.detail.text-content')
    item['address'] = self.extract(response, '#left > div.property > div.address > span.value')
    item['area'] = self.extract(response, '#left > div.property > div.moreinfor > span.square > span.value')
    item['start_date'] = self.extract(response, '#left > div.property > div.title > span', 'start_date')
    item['end_date'] = None

    result_table = self.extract_table(response.css('table').get())
    item['floor_number'] = result_table[0]
    item['bedroom_number'] = result_table[1]
    item['is_dinning_room'] = result_table[2]
    item['is_kitchen'] = result_table[3]
    item['is_terrace'] = result_table[4]
    item['is_car_pack'] = result_table[5]
    item['is_owner'] = result_table[6]
    item['type'] = result_table[7]
    item['direction'] = result_table[8]
    item['street_in_front_of_house'] = result_table[9]
    item['width'] = result_table[10]
    item['height'] = result_table[11]
    item['law'] = result_table[12]

    yield item
In this function, we must declare a DataPriceItem and return that object so that the Scrapy pipeline runs smoothly. The extract or extract_table functions are additional functions written to reuse code.
To see the detailed code of the project, you can check out Demanejar’s project repo: https://github.com/demanejar/crawl-alonhadat.
In the project, I also used an additional BeautifulSoup library to analyze HTML code (used in the extract_table function, you can go into the repo on GitHub to see details). BeautifulSoup is also quite a famous library for extracting and analyzing information from websites. However, in my opinion, BeautifulSoup is stronger in HTML code analysis and I often use BeautifulSoup in Scrapy to analyze some HTML code segments.
Running Scrapy
Finally, after writing everything, let’s run the project to extract data with the command:
1
scrapy crawl alonhadat -o ../data/output.json --set FEED_EXPORT_ENCODING=utf-8
The raw crawled data you can reference at: https://github.com/trannguyenhan/house-price-prediction/tree/master/data.
Currently, alonhadat has some measures to avoid being crawled. With this article, I haven’t covered how to overcome this blocking by alonhadat yet, I’ll cover more in later articles in this series. This article only covers how to analyze and extract data from the website. For the repos mentioned in the article, if you find them useful, please give the repos a star, thank you everyone! I’ll end this article here.
Since the website doesn’t have a comment section under the article, please discuss and give me feedback at this GITHUB DISCUSSION: https://github.com/orgs/demanejar/discussions/1.