
This article is referenced and noted from the practical Docker series on Viblo.
Series link here: Practical Docker from Basics
I. Installing Docker and Some Basic Concepts
Installation can be referenced in the documentation
WHAT IS DOCKER
Benefits of Containerized Applications
- Build once, run anywhere (works on my machine problem solved)
- Isolated environment
- Easy development
- Scalability (container orchestration)
Previously we had virtual machines with similar characteristics, but why do we have Docker too? Docker virtualizes at the OS level while virtual machines virtualize at the hardware level
IMAGES AND CONTAINERS
Since we already know what containers are it’s easier to explain images through them: Containers are instances of images. A basic mistake is to confuse images and containers.
Docker images are read-only files that cannot be changed (actually you can add layers by starting from a base image). Images are created by building an instruction file called a Dockerfile.
Containers are created from images (read-write). They contain everything necessary to run the program and are an isolated environment on the host that can interact with other machines and itself through TCP/UDP protocols.
Docker run vs Docker start: The command docker run is used to only START a container for the very first time. To run an existing container what you need is docker start $container-name
docker run = create docker container + start docker container
II. Sharing Data Between Host-Container and Container-Container
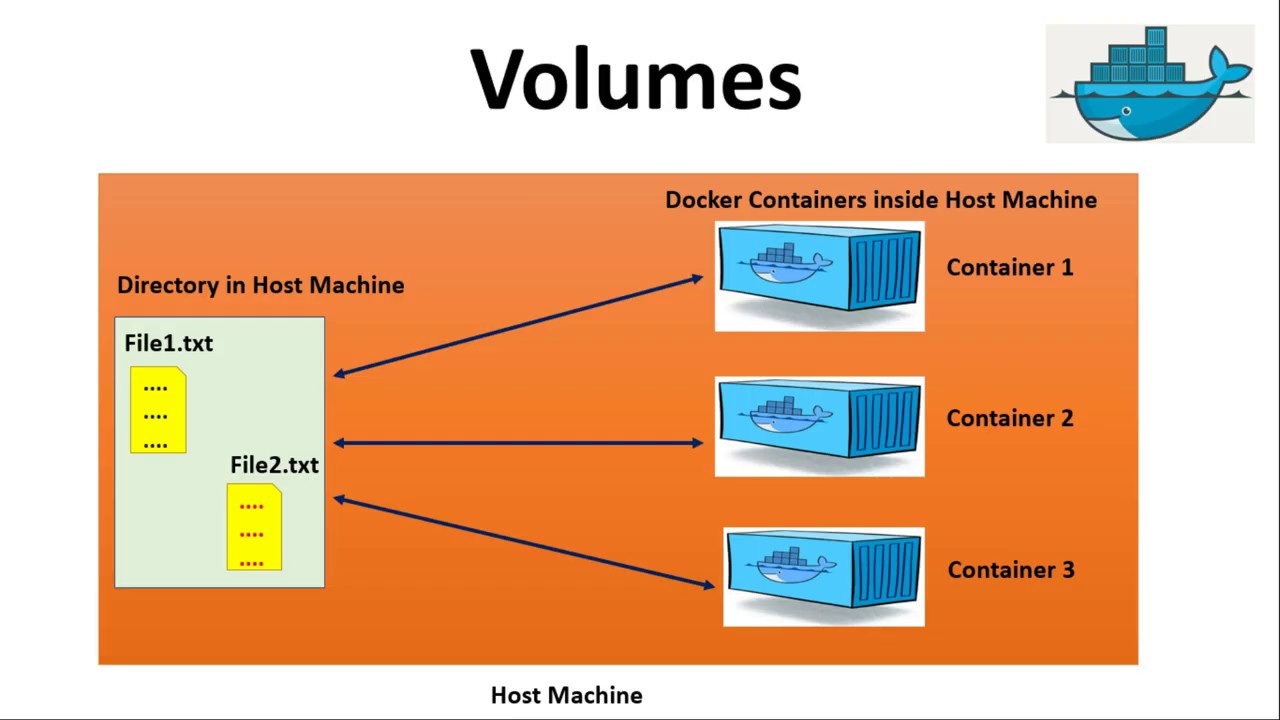
Data sharing means containers want to operate on or use data on the host machine or on other containers.
Host-Container Data Sharing
Suppose we just created data on the host machine with path X
1
docker run -ti -v /home/viethoang/petproject:/home/petproject_container ubuntu
Parameter explanation
-ti: provides terminal operations and connection
-v: shares data between host and container. The first path is of the host machine, the one after : is of the container ubuntu is the Ubuntu OS image
After running the command, we enter the container’s terminal and see that the “petproject” folder on the host maps to the “petproject_container” folder. Any changes in the host folder will affect the container and vice versa, for example adding or deleting. The same applies when in the container. However, if we delete the container, the data on the host will still remain.
Data Sharing Between 2 Containers
Now we have data on the host machine that we want to share with both containers. We already have 1 container shared from the host with the id as shown below, so to share data from host to the remaining container we can use the command:
1
docker run -ti --name C2 --volume-from a8232b31eb20 ubuntu
Managing Volumes to Share Data for Containers
When a container is created, a volume is also created and attached to that container. When the container is deleted, the volumes still remain there and are only lost when we delete them directly.
1. Creating Volumes
Command docker volume ls to view volumes.
Create a new volume named D1: docker volume create D1.
2. Mounting Volumes to Containers
We execute the command:
1
 docker run -it --name C3 --mount source=D1,target=/home/disk ubuntu
Parameter --mount is to mount additional volumes when creating containers
source=D1 is the volume parameter to mount into the container
target=/home/disk where /home/disk is the directory that maps volume D1 into the container
3. Creating Volumes Mapped to Host Machine
Now we want a volume mapped to a fixed existing folder on the host:
1
docker volume create --opt device=/home/viethoang/petproject --opt type=none --opt o=bind D2
Check again:
1
2
3
4
5
6
7
8
9
10
11
12
13
14
15
16
17
~ docker volume inspect D2
[
    {
        "CreatedAt": "2021-07-28T16:19:19+07:00",
        "Driver": "local",
        "Labels": {},
        "Mountpoint": "/var/lib/docker/volumes/D2/_data",
        "Name": "D2",
        "Options": {
            "device": "/home/viethoang/petproject",
            "o": "bind",
            "type": "none"
        },
        "Scope": "local"
    }
]
- Creating Container with Local Mapped Volume
1
docker run -it --name C4 -v D2:/home/disk ubuntu
Container C4 is created from ubuntu image with mounted volume D2 and the volume is mapped to a folder on the host from the previous part
1
2
3
4
~ docker exec -it  C4 bash
root@976236084a9c:/# ls /home/disk/
20202  20203  Algorithm-application  DE  Non-Trivial-DE  aia  ktlt
root@976236084a9c:/#
III. Creating and Managing Networks in Docker
Some Concepts and Default Networks
Concepts
Docker network ensures containers connect to the network:
- Containers on the same network can communicate with each other through name and port they listen on that network
- Connect to one or many hosts
- Connect containers with other networks outside docker
- Connect between container clusters
Default Network
There are 3 types of networks automatically created in docker: bridge, none, host which can be viewed with the command docker network ls.
bridge this is Docker’s default network driver. Bridge is the most suitable driver for communication between independent containers. Containers in the same network can communicate with each other via IP address. If no driver is specified, bridge will be the default network driver when initializing.
none driver provides a container with its own networking stack and network namespace, usually used with custom networks. This driver cannot be used in swarm clusters.
host used when containers need to communicate with the host and use the host machine’s network directly.
Creating Container-to-Container Connections
Try creating 2 containers on the same bridge network so the 2 containers can connect to each other:
1
 docker run -it --rm --name B1 busybox`
After creation, check if container B1 has appeared in the bridge network:
1
 docker network inspect bridge
Or check by container:
1
docker inspect B1
Then create a similar B2 container, check and try to ping from B1 to B2:
1
docker attach B1
The above command will enter container B1 and use its terminal to ping.
Creating Connection Between Host and Container
1
docker run -it --name B3 -p 8888:80 busybox
-p 8888:80 means mapping port 8888 on host to port 80 on container, meaning port 8888 on host will display content from port 80 of the container.
Creating Docker Network
Purpose is to create separate networks for containers to use independently from each other
1: Create network
docker network create --driver bridge network1
The above command creates network1, we can check with docker network ls.
2: Delete network
docker network rm name_network
3: Create container connecting to a specified network
docker run -it --name B4 --network network1 busybox
4: Connect a running container to another network
Example: we have 2 networks network1 and network2, there’s a container B5 currently connected to network1 and we want this container to connect to network2 as well, then we run the command.
docker network connect network2 B5
The above command connects container B5 to network2
IV. Dockerfile, Building Images from Dockerfile
Introduction to Dockerfile
Dockerfile is a text file that contains instructions for docker to build images
Dockerfile = comments + command + arguments
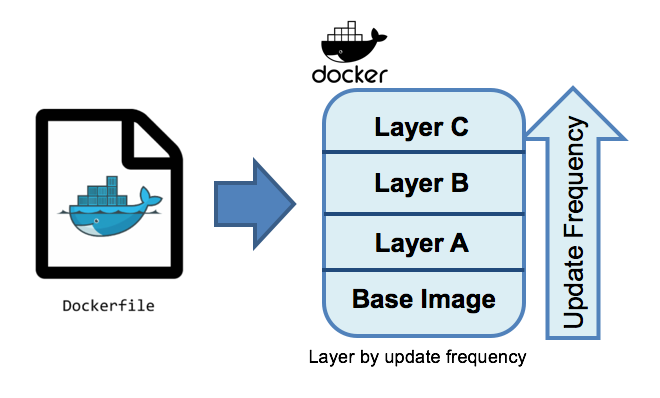
Docker images are made up of multiple layers and by default start from a base layer. These layers are created from commands in the dockerfile
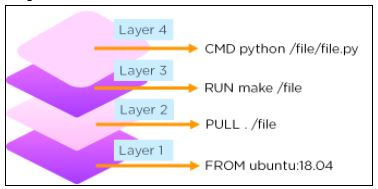
Writing Dockerfile
Dockerfile Syntax
The general syntax of a Dockerfile is:
1
INSTRUCTION arguments
- INSTRUCTION is the name of directives in Dockerfile, each directive performs a specific task, defined by Docker. When declaring these directives must be written in UPPERCASE.
- A Dockerfile must start with the FROM directive to declare what image will be used as the base to build your image.
argumentsis the content part of the directives, determining what the directive will do.
Example:
1
2
3
4
5
6
FROM alpine:3.4

RUN apk update && \
    apk add curl && \
    apk add git && \
    apk add vim
Main Directives in Dockerfile
FROM
Specifies which image will be used as the base image for the build process to execute subsequent commands. These base images will be downloaded from Public Repository or Private Repository depending on individual setup.
Syntax:
1
2
3
FROM <image> [AS <name>]
FROM <image>[:<tag>] [AS <name>]
FROM <image>[@<digest>] [AS <name>]
The FROM directive is mandatory and must be placed at the top of the Dockerfile.
Example:
1
2
3
FROM ubuntu
or
FROM ubuntu:latest
LABEL
The LABEL directive is used to add metadata to Docker Image when they are built. They exist as key - value pairs, stored as strings. You can specify multiple labels for a Docker Image, and of course each key - value pair must be unique. If the same key is declared with multiple values, the most recently declared value will override the previous value.
Syntax:
1
LABEL <key>=<value> <key>=<value> <key>=<value> ... <key>=<value>
You can declare metadata for Image line by line or separate into individual lines.
Example:
1
2
LABEL com.example.some-label="lorem"
LABEL version="2.0" description="Lorem ipsum dolor sit amet, consectetur adipiscing elit."
To view metadata of a Docker Image, use the command:
1
docker inspect <image id>
Example:
MAINTAINER
The MAINTAINER directive is used to declare information about the author who wrote the Dockerfile.
Syntax:
1
MAINTAINER <name> [<email>]
Example:
1
MAINTAINER NamDH <namduong3699@gmail.com>
Currently, according to official documentation from Docker, declaring MAINTAINER is gradually being replaced by LABEL maintainer due to its flexibility when besides author name and email information, we can add many other optional information through metadata tags and can easily get information with the docker inspect ... command.
Example:
1
LABEL maintainer="namduong3699@gmail.com"
RUN
The RUN directive is used to run a command during the image build process, usually Linux commands. Depending on the base image declared in the FROM section, there will be corresponding commands. For example, to run the update command for Ubuntu it would be RUN apt-get update -y while for CentOS it would be Run yum update -y. The command result will be committed, and that commit result will be used in the next step of the Dockerfile.
Syntax:
1
2
RUN <command>
RUN ["executable", "param1", "param2"]
Example:
1
2
3
RUN /bin/bash -c 'source $HOME/.bashrc; echo $HOME'
-------- or --------
RUN ["/bin/bash", "-c", "echo hello"]
In shell form you can execute multiple commands at once with \:
1
2
3
FROM ubuntu
RUN apt-get update
RUN apt-get install curl -y
or
1
2
3
FROM ubuntu
RUN apt-get update; \
    apt-get install curl -y
ADD
The ADD directive will copy files, directories from the build machine or remote file URLs from src and add them to the image filesystem dest.
Syntax:
1
2
ADD [--chown=<user>:<group>] <src>... <dest>
ADD [--chown=<user>:<group>] ["<src>",... "<dest>"]
Where:
- src can declare multiple files, directories, …
- dest must be an absolute path or relative to WORKDIR directive.
Example:
1
2
3
ADD hom* /mydir/
ADD hom?.txt /mydir/
ADD test.txt relativeDir/
You can also set permissions on newly copied files/directories:
1
2
3
4
ADD --chown=55:mygroup files* /somedir/
ADD --chown=bin files* /somedir/
ADD --chown=1 files* /somedir/
ADD --chown=10:11 files* /somedir/
COPY
The COPY directive is similar to ADD in copying files, directories from <src> and adding them to <dest> of the container. Unlike ADD, it doesn’t support adding remote file URLs from network sources.
Syntax:
1
2
COPY [--chown=<user>:<group>] <src>... <dest>
COPY [--chown=<user>:<group>] ["<src>",... "<dest>"]
ENV
The ENV directive is used to declare environment variables. These variables are declared as key - value pairs using strings. The values of these variables will be available for subsequent Dockerfile directives.
Syntax:
1
ENV <key>=<value> ...
Example:
1
2
3
ENV DOMAIN="viblo.asia"
ENV PORT=80
ENV USERNAME="namdh" PASSWORD="secret"
You can also change environment variable values with container startup command:
1
docker run --env <key>=<value>
ENV can only be used in the following commands:
- ADD
- COPY
- ENV
- EXPOSE
- FROM
- LABEL
- STOPSIGNAL
- USER
- VOLUME
- WORKDIR
CMD
The CMD directive defines commands that will be run after the container is started from the built image. You can declare multiple but only the last CMD will be executed.
Syntax:
1
2
3
CMD ["executable","param1","param2"]
CMD ["param1","param2"]
CMD command param1 param2
Example:
1
2
FROM ubuntu
CMD echo Viblo
USER
Sets username or UID to use when running the image and when running commands in RUN, CMD, ENTRYPOINT after it.
Syntax:
1
2
3
USER <user>[:<group>]
or
USER <UID>[:<GID>]
Example:
1
2
3
FROM alpine:3.4
RUN useradd -ms /bin/bash namdh
USER namdh
Creating Images with Dockerfile
Above I’ve covered the structure and main directives of a Dockerfile. Now we’ll practice building an image by writing a simple Dockerfile. Note that before starting, make sure your machine has Docker installed. If not, you can refer to the installation guide here.
Creating Dockerfile
Example 1
In this step, we’ll create a new path for the Dockerfile.
1
mkdir myproject && cd myproject
Next is creating the Dockerfile, note that the name of Dockerfile must be exactly “Dockerfile” with no file extension. If not named correctly, the system will report an error that the file cannot be found when building.
1
touch Dockerfile
After creating the Dockerfile, we proceed to enter the directives:
1
2
FROM alpine
CMD ["echo", "Hello world!"]
As you can see, the Dockerfile content above only contains 2 directives FROM and CMD. CMD contains the echo command and will print “Hello world!” to screen when the container is started from the image built from this Dockerfile. We proceed to create the image with the command:
1
docker build -t <image name> .
Finally, we run docker run <imageID> to create and run the container. The result will be “Hello world!” printed on screen.
V. Docker-compose
Concepts
Is a tool that helps us set up and manage multiple containers, networks, volumes (collectively called services) and configure services quickly and simply by running according to specifications in the docker-compose.yml file
Main Functions
- Create and manage multiple independent environments in one host machine ensuring independent storage partitions to avoid conflicts
- Only recreate changed containers, recognize unchanged containers and reuse them
- Define and use environment variables in YAML file
Docker-compose.yml
Is a file saved in yaml format, this file stores instructions for docker compose to read and execute those instructions, such as creating containers from images, creating networks, configuring services.
1
2
3
4
5
6
7
8
9
10
11
12
13
14
15
version: "3.9"  # optional since v1.27.0
services:
  web:
    build: .
    ports:
      - "5000:5000"
    volumes:
      - .:/code
      - logvolume01:/var/log
    links:
      - redis
  redis:
    image: redis
volumes:
  logvolume01: {}
Docker-compose Practice
Our practice task is to define a docker file to create the following components
- MySQL Container
- Apache HTTP Container
- PHP-FPM Container
- Network (bridge) for the above services to connect to this network
- Map port 9999 of host machine to port 80 of HTTP server
Creating docker-compose.yml
Create mycode directory, inside we create docker-compose.yml file with the following content (I have commented explanations in the file content).
1
2
3
4
5
6
7
8
9
10
11
12
13
14
15
16
17
18
19
20
21
22
23
24
25
26
27
28
29
30
31
32
33
34
35
36
37
38
39
40
41
42
43
44
version: "3" #docker composer version

#Create network named my-network
networks:
    my-network:
        driver: bridge

# Create services (containers)
services:

    #Create my-php container from php:latest image connected to my-network
    my-php:
        container_name: php-product
        image: 'php:latest'
        hostname: php
        restart: always
        networks:
            - my-network

    #Create my-httpd container from httpd:latest image connected to my-network, map port 9999 of host to port 80
    my-httpd:
        container_name: c-httpd01
        image: 'httpd:latest'
        hostname: httpd
        restart: always
        networks:
            - my-network
        ports:
            - "9999:80"
            - "443:443"

     #Create my-mysql container from mysql:latest image connected to my-network, configure environment variables
    my-mysql:
        container_name: myql-product
        image: "mysql:latest"
        hostname: mysql
        restart: always
        networks:
            - my-network
        environment:
            - MYSQL_ROOT_PASSWORD=123abc
            - MYSQL_DATABASE=db_site
            - MYSQL_USER=sites
            - MYSQL_PASSWORD=123abc
The file above is divided into 3 parts
The first part declares the docker composer version, here I use version 3
- The next part declares network creation, here I create a network named my-network of bridge type
The next part creates services, here creating 3 services which are 3 containers (php, httpd, mysql), all these services connect to the my-network created in part 2
- Container my-php created from php:latest image connected to my-network
- Container my-httpd created from httpd:latest image connected to my-network, mapping port 9999 of host to port 80 and port 443 to 443 of host
- Container my-mysql created from mysql:latest image connected to my-network, configuring environment variables like MYSQL_ROOT_PASSWORD, MYSQL_DATABASE, MYSQL_USER, MYSQL_PASSWORD
Run docker-compose.yml file to create services
After creating the docker compose file, now we’ll run this file to create the defined services.
Go to the directory containing docker-compose.yml file and run the command
docker-compose up
To stop running services use the command
docker-compose stop
To terminate running services and completely delete containers use the command
docker-compose down
Monitor service logs
docker-compose logs [SERVICES]
VI. Docker swarm
VII. References
Other reference sources: